|
Step 1
Make a new image by going to File/New with a transparent background
(350x350 pixels)
Make your foreground color #9f9f59
Make your background color #a8a1b3 (Look
at the
Color Palette if you don't know how to do it)
Change the foreground to gradient.
Click in your foreground color and in your drop down menu to change
the settings like below:
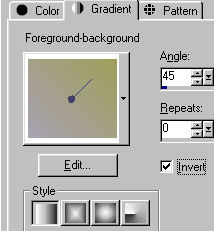
Flood fill your image with the gradient.
You can change it back to normal color now.
*Step 2
Add a new raster layer. (Layers - new
Raster layer)
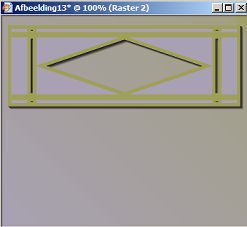
Select the tool Preset shapes.
Select the shape R.
Use the next settings:

Drag a rectangle from upper left to the right almost all over your
canvas.
Make sure you have some space left on the upper part and the
both sides.
Effects - 3D effects - Drop Shadow - 1-1-65-1
Repeat the Drop Shadow.
Effects - Texture Effects - Blinds - Width 6 en Opacity 24 - Color
Black - Select horizontal and light from left/above
*Step 3
Add a new raster layer.
Select the preset shape R. again, whit the same settings as in step
2.
Now drag a square from the middle of the canvas to right under.
Left some space around it again.
Effects - 3D effects - Drop Shadow- 1-1-65-1
Repeat the Drop Shadow.
Effects - Texture Effects - Blinds - Width 6 en Opacity 24 - Color
Black- Select hor. en light from left/above.
*Step 4
Open the supplied tube.
Copy the tube and paste as a new layer in your image.
Click with your magic wand in all white areas around the woman.
By holding Shift you can select more pieces at the same time. You've
got all the white pieces (also between the scarf)? Then hit Delete
key.
Image - Mirror.
Layers - Arrange - Move downwards. The tube will now be under the
square.
Whit your Mover you drag the tube downwards so you can see the head
in the window of your bottom square.
Now you can still see something of the tube under de square.
Erase this. Make sure you're on the right layer!
*Step 5
Copy your tube again and paste as a new
layer in your image.
Layers - arrange - Bring to top.
Remove the white areas again.
Effects - 3D effects - Drop shadow. 1-1-65-1. Repeat the drop shadow.
You can stipulate the exact place for the tube later, after you've
made the text.
*Step 6
Add a new raster layer.
Select your text tool (A). Switch the for- and background color.
You can do this by clicking on the half round arrows between the
colors.
Use the next settings:

This is the right size for 6 characters. Maybe your name is longer
or shorter. You can change the size of the characters then.
Type in your name in the text window that appears. You can see the
characters on your image already and change it if you're not
satisfied.
The characters shall be vertical en has to be placed among the big
square on the left site.
Apply Drop shadow 2 times again.
Put your tube on a place that you like.
*Step 7
Image - Add Borders - 8 pixels, check
symmetric
Make the border in the green background color. By clicking with
the right into the color (in the window from Add borders) you can
see the foreground - and background color and change it if you want to.
You will get a report now, that the layers will be merged. You can
just click yes.
Click with your magic wand in the green border.
Effects - Texture Effects - Blinds (settings are still ok)
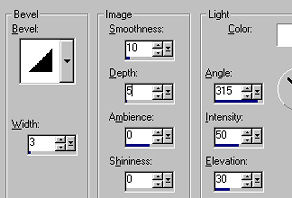
Effects - 3D effects - Inner Bevel with the next settings:
Selections - select none.
Adjust - sharpen - sharpen.
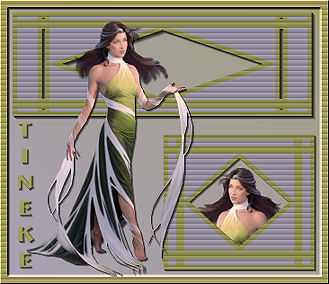
So, this was the first lesson.
I hope you enjoyed my tutorial and that I explained everything well
enough.
|
